Armour Stone is a specialized, high-performance aggregate used in a variety of heavy-duty applications such as coastal defense, erosion control, and heavy traffic areas. Its installation is a meticulous process that requires careful planning and execution to ensure the durability and effectiveness of the structure. This guide will walk one through the detailed steps of installing Armour Stone, covering everything from initial planning to final inspection. And for those who don’t want to install their own Armour Stone, the professionals can do it!
1. Planning and Preparation
1.1 Site Assessment
Before beginning the installation of Armour Stone, a thorough site assessment is crucial. This involves:
– Geological Survey: Understand the underlying soil and rock types, as these will influence the stability and drainage capabilities of the Armour Stone installation.
– Hydrological Analysis: For applications involving water (e.g., coastal defense), it’s essential to study tidal patterns, wave heights, and water flow to design an effective structure.
– Environmental Impact: Assess potential environmental impacts and obtain necessary permits. This may involve consultations with environmental agencies to ensure compliance with regulations.
1.2 Design Considerations
The design phase should account for:
– Load-Bearing Capacity: Determine the required thickness and layering of Armour Stone based on expected loads.
– Drainage: Proper drainage systems must be integrated to prevent water buildup, which can undermine the stability of the structure.
– Accessibility: Ensure the site is accessible for heavy machinery and transportation of materials.
1.3 Material Selection
Choose the appropriate type and size of Armour Stone for one’s specific application. Factors to consider include:
– Size and Grading: The size of Armour Stone varies depending on the application. Larger stones are used for areas with high impact forces, while smaller stones might be suitable for less demanding conditions.
– Material Quality: Ensure the stones are of high quality, free from cracks or weaknesses that could compromise the structure.

2. Site Preparation
2.1 Clearing and Excavation
Clear the site of any vegetation, debris, or old structures that could interfere with the installation. Excavation may be necessary to create a stable base for the Armour Stone.
2.2 Subgrade Preparation
Prepare the subgrade by:
– Compacting the Soil: Use heavy machinery to compact the soil, providing a firm foundation.
– Geotextile Fabric Installation: Lay down a geotextile fabric to prevent soil erosion and enhance stability. The fabric should cover the entire area and extend slightly beyond the edges.
2.3 Foundation Layer
Depending on the project requirements, a foundation layer of smaller aggregate or sand may be laid to provide a smooth, stable base for the Armour Stone.
3. Armour Stone Installation
3.1 Placement of Stones
The placement of Armour Stone involves several steps:
– Initial Layer: Begin with the largest stones, placing them directly on the prepared foundation. This layer serves as the primary load-bearing structure.
– Interlocking: Ensure the stones are interlocked tightly. This enhances stability and prevents movement under load.
– Layering: Continue layering the stones, gradually using smaller sizes towards the top to create a well-graded structure.
3.2 Equipment Use
The installation process typically involves:
– Excavators and Cranes: For lifting and placing large stones accurately.
– Vibratory Rollers: To compact each layer and ensure stones are set firmly.
3.3 Alignment and Leveling
Regularly check the alignment and level of the structure using:
– Laser Levels: For precise measurements.
– String Lines: To ensure straight edges and even surfaces.
4. Quality Control
4.1 Inspection
Conduct regular inspections to ensure:
– Correct Placement: Stones are placed according to the design specifications.
– Interlocking: Stones are tightly interlocked without gaps.
– Stability: The structure is stable and shows no signs of movement or settling.
4.2 Testing
Perform testing to verify:
– Load-Bearing Capacity: Conduct load tests to ensure the structure can withstand expected forces.
– Drainage Efficiency: Test drainage systems to ensure water is effectively diverted away from the structure.
5. Finishing Touches
5.1 Surface Treatment
Depending on the application, a surface treatment may be applied:
– Sealants: For structures exposed to harsh weather conditions, sealants can provide additional protection.
– Surface Smoothing: For aesthetic purposes, the surface may be smoothed or additional layers of smaller aggregate applied.
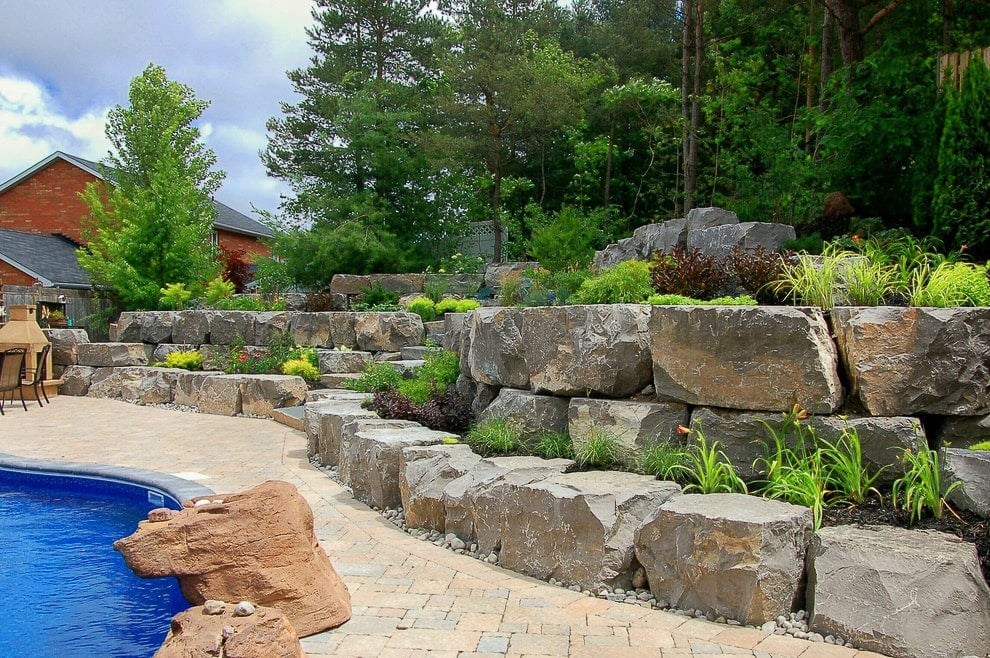
5.2 Vegetation and Landscaping
Integrate vegetation and landscaping to enhance the appearance and environmental integration of the structure:
– Planting Grass or Shrubs: Around the edges to stabilize the soil.
– Erosion Control: Use plants with deep roots to further prevent erosion.
6. Maintenance and Monitoring
6.1 Regular Inspections
Conduct regular inspections to:
– Identify Damage: Look for signs of wear, movement, or damage.
– Assess Stability: Ensure the structure remains stable over time.
6.2 Repairs
Promptly address any issues:
– Replace Damaged Stones: Remove and replace any stones that show signs of cracking or displacement.
– Recompact Layers: If settling occurs, recompact the affected areas.
6.3 Monitoring Systems
In critical applications, consider installing monitoring systems:
– Sensors: To detect movement or pressure changes within the structure.
– Remote Monitoring: For real-time data on the structure’s performance.
7. Case Studies and Applications
7.1 Coastal Defense
Armour Stone is commonly used in coastal defense structures such as seawalls and breakwaters. These structures are designed to:
– Protect Shorelines: From erosion caused by waves and tidal action.
– Dissipate Wave Energy: The interlocking stones absorb and dissipate the energy of incoming waves, reducing their impact on the shore.
7.2 Erosion Control
In areas prone to erosion, Armour Stone is used to stabilize slopes and riverbanks:
– Slope Stabilization: By providing a stable surface that resists the erosive forces of wind and water.
– Riverbank Protection: Preventing the undercutting and collapse of riverbanks during high flow events.

7.3 Heavy Traffic Areas
Armour Stone is also used in areas subject to heavy vehicular traffic, such as:
– Road Bases: Providing a durable and stable foundation for roads.
– Parking Lots: Where the load-bearing capacity is crucial to prevent ruts and potholes.
The installation of Armour Stone is a complex process that requires careful planning, precise execution, and ongoing maintenance. By following these detailed steps, one can ensure the successful implementation of Armour Stone in a variety of applications, from coastal defense to erosion control and heavy traffic areas. Each project will have its unique challenges and requirements, but the fundamental principles outlined in this guide will provide a solid foundation for one’s work. Remember, the key to a successful Armour Stone installation is meticulous attention to detail at every stage of the process. And also remember, because this can sometimes be dangerous, it may be better to let the professionals do it!